Do Not Call List Registry Check 5 Instruction Manual
Last revision made on October 1, 2017Table Of Contents
- Do Not Call List Registry Check 5 Instruction Manual
- What is the Do Not Call List?
- How Can Do Not Call List Registry Check 5 © Help?
- Getting Do Not Call Lists
- Settings
- Maintaining Do Not Call Lists
- Maintaining Government Do Not Call Lists
- Maintaining Custom Do Not Call Lists
- Single Searches
- Scrubbing Lists (Bulk Searches)
- Warning System
- MDB Wizard
- Reports
- Updates
What is the Do Not Call List?
On September 1, 2003, the Federal Trade Commission (FTC) put online a national list of consumers’ phone numbers who wished to not be called by telemarketers. Starting October 1, 2003, the FTC, the Federal Communications Commission (FCC) and local agencies began to enforce compliance with the list. The provision mandates that no telemarketer may call a phone number on the list, with exception to political organizations, charities, telephone surveyors, or companies with which a consumer has an existing business relationship. Violations can be costly: up to $40,654 per violation! To find out more about the Do Not Call List, please visit the FTC's Do Not Call List FAQ.How Can Do Not Call List Registry Check 5 © Help?
This application can help in two ways. First and foremost, the application will inform its user if a phone number is on the Do Not Call List and is capable of removing (or grouping) Do Not Call numbers from contact lists. Secondly, the FTC has a “Safe Harbor” clause for inadvertent mistakes:
If a seller or telemarketer can show that, as part of its routine business practice, it meets all the requirements of the safe harbor, it will not be subject to civil penalties or sanctions for mistakenly calling a consumer who has asked for no more calls, or for calling a person on the registry. To meet the safe harbor requirements, the seller or telemarketer must demonstrate that:
- It has written procedures to comply with the do not call requirements
- It trains its personnel in those procedures
- It monitors and enforces compliance with these procedures
- It maintains a company-specific list of telephone numbers that it may not call
- It accesses the national registry no more than 31 days (starting January 1, 2005) before calling any consumer, and maintains records documenting this process
- Any call made in violation of the do not call rules was the result of an error.
Do Not Call List Registry Check 5 © can play a major role in keeping an organization protected under the “Safe Harbor” clause.
Getting Do Not Call Lists
Do Not Call Lists are provided by the Federal Trade Commission, and can be obtained at https://telemarketing.donotcall.gov. You don’t have to bookmark this webpage, a link to the website is provided in the application.
The Canadian National Do Not Call List is provided by the Canadian Radio-television and Telecommunications Commission at https://www.lnnte-dncl.gc.ca/ind/accueil-home-eng.
Settings
Do Not Call List Registry Check © needs hard drive space to store Do Not Call records. The first time you run Do Not Call List Registry Check © you will be asked to provide a file path for the application to store its records in. If you are unsure of what to do, you can leave the default settings.
Note that the provided path can be a file share; this allows multiple installations of Do Not Call List Registry Check © to point to the same Do Not Call data. However, there are some caveats:
- The share must provide read privileges to all users that will be running Do Not Call List Registry Check ©
- The share must provide read/write privileges to all users that will be maintaining Do Not Call lists.
- Do Not Call List Registry Check © is not a server product; it is not designed to be used by a large number of people at the same time. Businesses with such requirements (e.g. large call centers) should inquire about our upcoming server product.
Maintaining Do Not Call Lists
Before we can do any searching or list scrubbing, we must import Do Not Call Lists into the database. Currently, the FTC requires that organizations update their databases at least once every 31 days, so this is a screen the user will be seeing at least once a month.
To access the Maintenance menu, click the “DNC List Maintenance” tab.
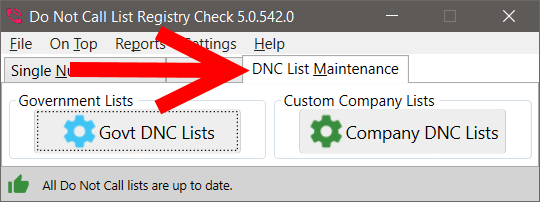
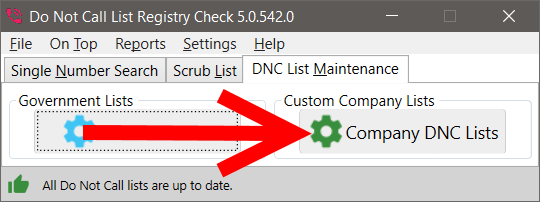
The List Maintenance Menu provides two options; one can select to maintain Government Do Not Call Lists or to maintain Custom/Company Do Not Call Lists. Government DNC Lists are provided by government agencies, such as the FTC. Company DNC Lists are created either in-house or by a third party vendor.
Maintaining Government Do Not Call Lists
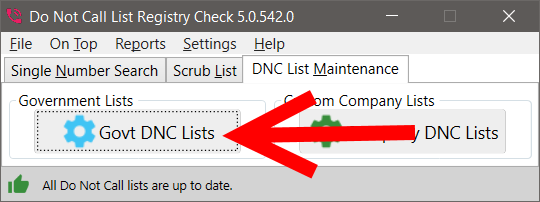
A government list is any list released by a Federal, State, or Local entity. Most lists conform to the FTC standards and should be “Importable” by this application. To import a Government list click the”Govt DNC Lists” button in the DNC List Maintenance tab.
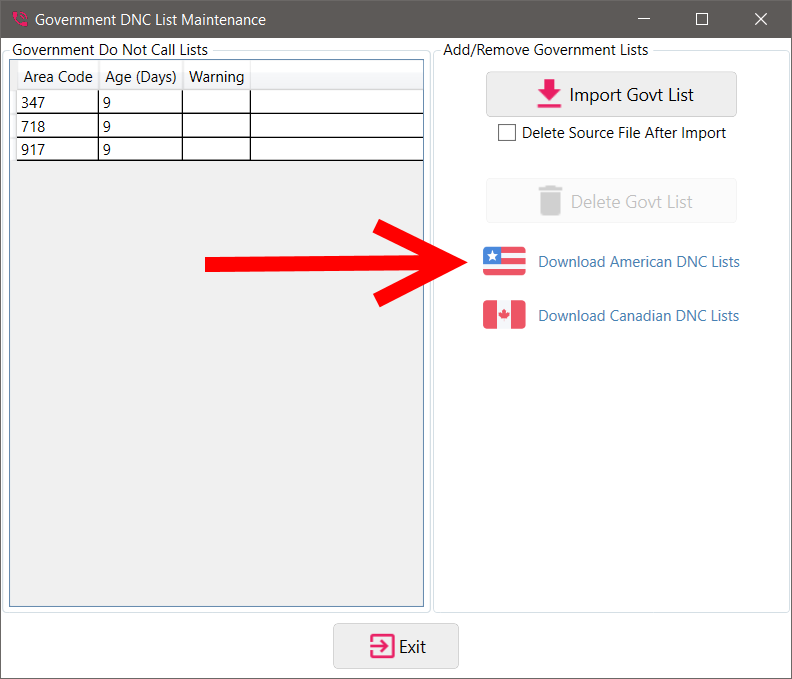
You will be brought to the “Government DNC List Maintenance screen. To the left is a grid that displays which area code lists are currently in the system, along with the age of each list (in days). The FTC mandates that a list can be no older than 31 days.
Before you can import lists, you must obtain them from the FTC website. You can always visit the FTC site through the application by clicking “Download American DNC Lists” (or the Canadian counterpart) hyperlink in this screen.
After signing on to the FTC website (http://www.donotcall.gov), click “Download Full List.”
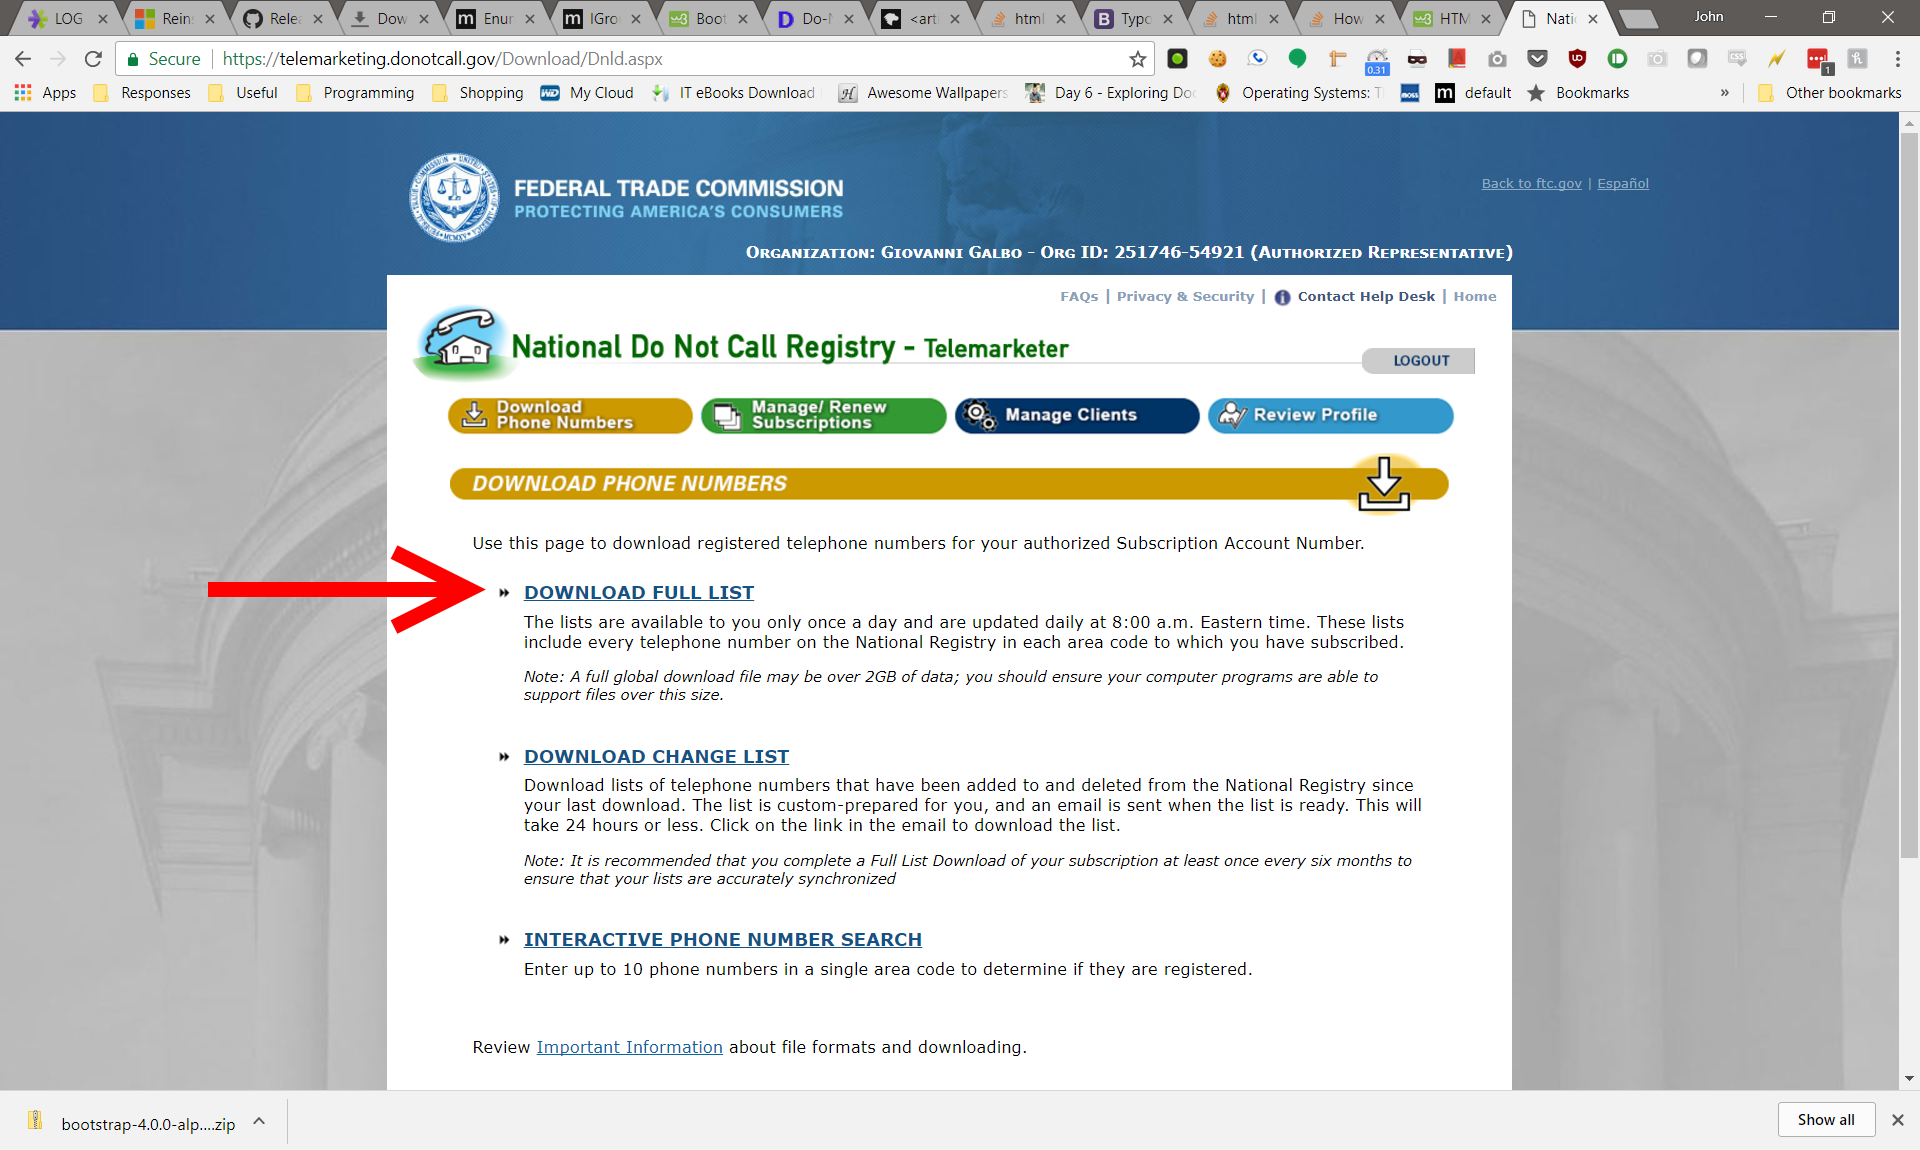
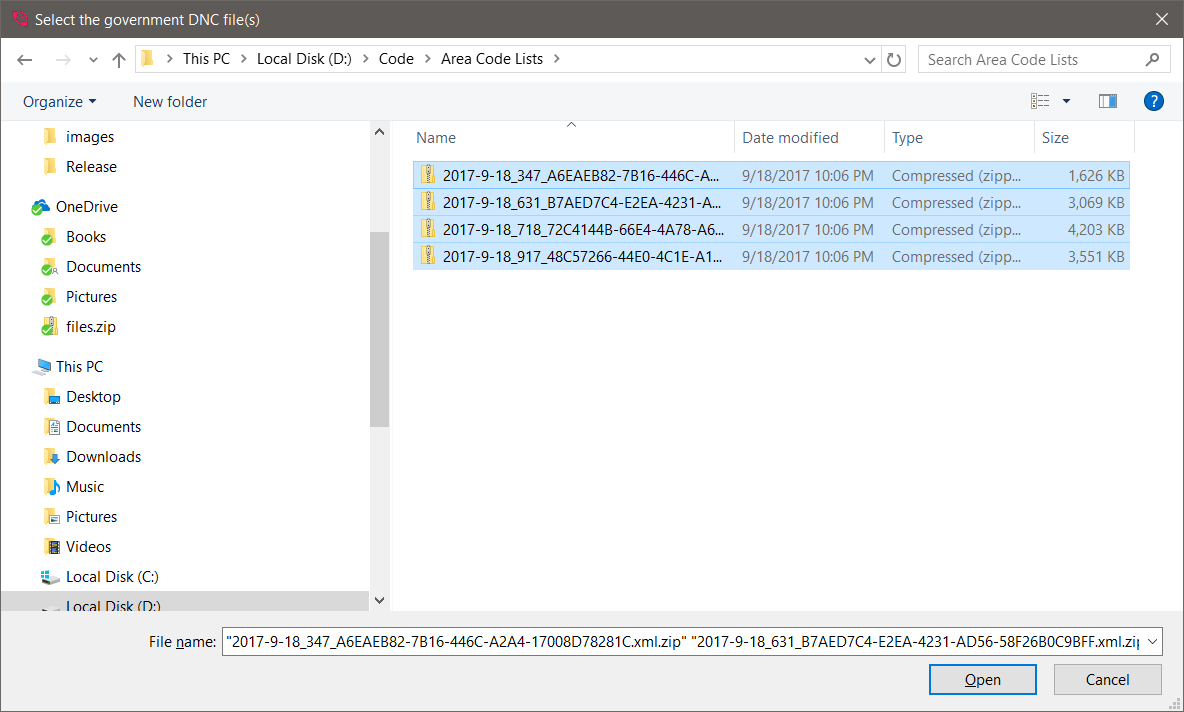
The next screen will present you with an option of downloading either Flat Text File or XML Tagged File. You can select either; though we recommend the Flat Text File option because it will be downloaded slightly quicker and it will be processed more quickly as well. After clicking “Begin” you will be brought to a new screen presenting all of the area code lists (and state lists) that you have subscribed to. Download all of the lists that you need.
The files downloaded will be compressed. You do not have to uncompress the files; the application will automatically uncompress the zipped files. The user should note that multiple files can selected at once if she holds the control key down while selecting files.
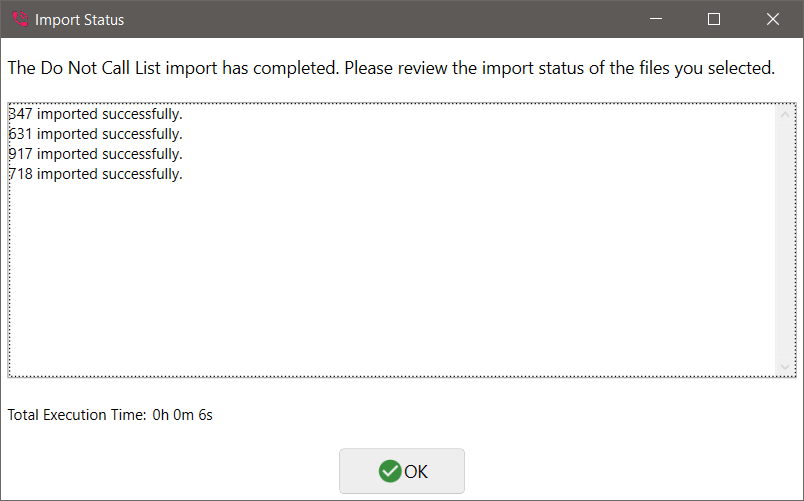
After clicking OK, it may take a few minutes to process all of the files (after all, each of them may contain a million or more listings!). A message reminding you that processing is occurring will appear until processing completes. A pop up status screen will inform you when the import is complete. You should review the contents of the status message to ensure that all of the selected lists were successfully imported. Any errors that may have occurred while importing will be visible in this screen.
The table should now be populated with one or more area codes imported.
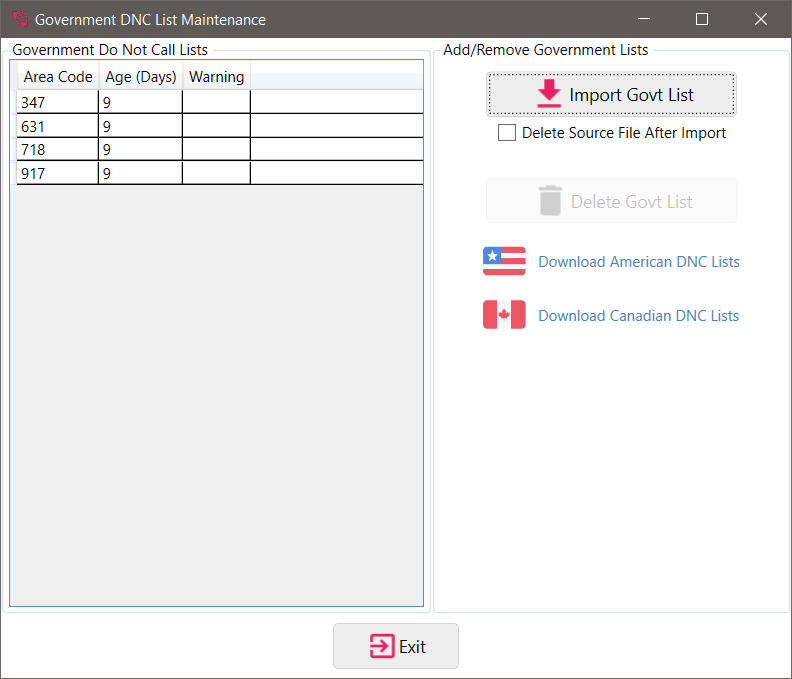
This table contains three columns: the area code, the list’s age in days and a warning. The user should note that the table can be sorted by either column by clicking the column header. A row can be selected by clicking just left of the area code. To remove an area code, select the desired area codes, and then click “Delete Govt List.”
Maintaining Government Do Not Call Lists
The user can enter DNC phone numbers into the system and also import DNC phone numbers from company DNC contact lists. To access the Custom Company Do Not Call List screen, click “Company DNC Lists” in the DNC List Maintenance Tab.
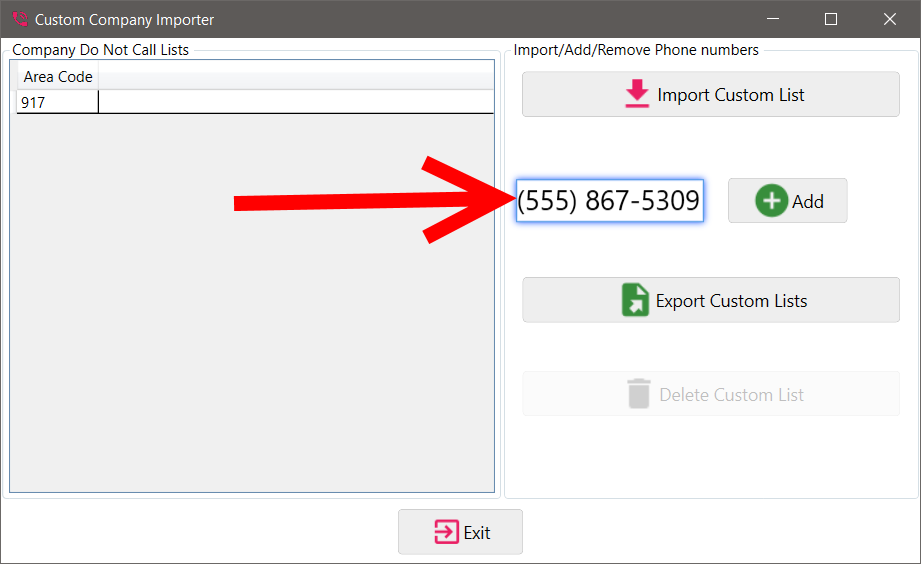
Adding Phone Numbers to Custom List
To add phone numbers to the company’s custom list, enter the 10 digit phone number into the masked text box and then click “Add.”
Importing Phone Numbers to Custom List
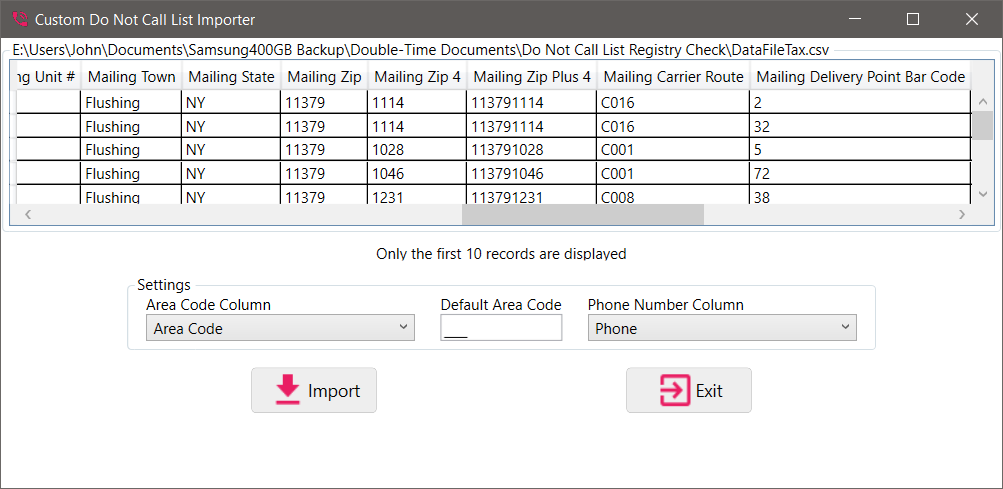
To import custom Do Not Call lists click “Import Custom List.” You will be prompted to select a file. Select the file that contains your company’s Do Not Call information (if this information is kept in multiple files then these steps will have to be repeated for each of the files). If you select an Excel file with multiple spreadsheets you will be asked to select appropriate spreadsheet. If you select an access database file (mdb) you will be presented with the MDB Wizard. Please see the “MDB Wizard” section of this document for more information.
After selecting a file you will be in the Custom DNC List Importer screen. The first 10 records of the file selected will be displayed. The application will attempt to automatically select the appropriate area code column (if there is one) and phone number column. Please ensure that they are correct; if they are not then select the appropriate column headers from the drop down lists. You may also specify a “default area code.” Whenever a phone number without an area code is encountered, the application will assume that it is part of the default area code. After making your selections click the “Import” button. The import process can take a few minutes, depending on the size of the file.
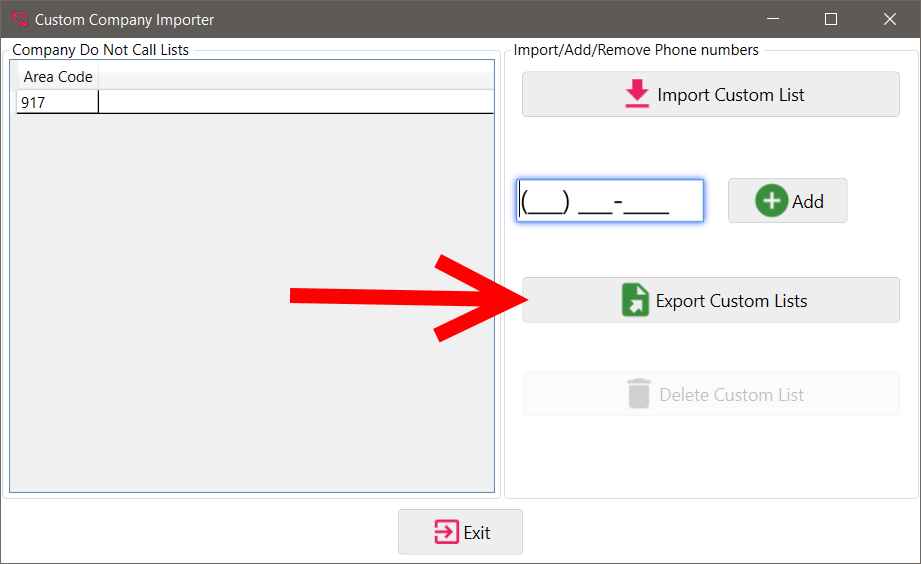
Exporting Phone Numbers from Custom List
To export all of the company’s custom Do Not Call List phone numbers, click the “Export” button.
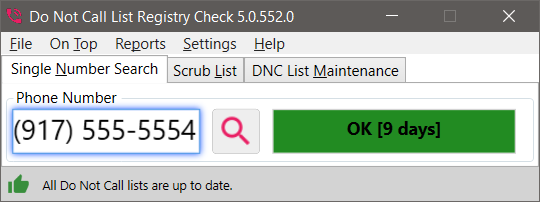
Single Searches
A single phone number search requires the user to enter the area code and phone number in the Main Screen. The result is color coded:
- Red - Do not call
- Yellow - Not found in the Do Not Call List, but the list is expired and therefore not reliable
- Green - Ok to call
If a government list for that area code is available, its age will be given (in days).
Scrubbing Lists (Bulk Searches)
To “scrub” a contact list, select the “Scrub List” tab.
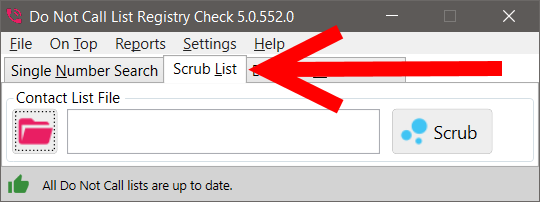
Click the button to the left of the text box (with the picture of a folder on it) to select the contact list you wish to scrub. The contact list can be in .CSV (or .TXT) (text delimited file), .XLS (older excel format ), .XLSX (Excel 2007+), .MDB (older Access database format)), or .ACCDB (Access 2007+). Click the “Scrub” button after selecting a file. If the file is in the Excel format and it contains more than one spreadsheet, you will be asked to select the sheet that you would like scrubbed. Please see the section titled “MDB Wizard” for more information on how to connect to an Access database and how to select a table from within the database.
The Scrub screen has a large table with a set of options at the bottom of the screen. The table should be filled with the contents of the selected file.
The application needs to know which columns hold the area code (optional) and phone number. The application will attempt to automatically select the appropriate area code column (if there is one) and phone number column. Please ensure that they are correct; if they are not then select the appropriate column headers from the drop down lists.
A default area code text field is provided so that a phone number without an area code will default to whatever is entered into this area.
If the user wishes to completely remove Do Not Call numbers, he should select “Remove Do Not Call Numbers,” otherwise he should select “Keep Do Not Call Numbers.” If the user not only wants to keep DNC numbers but would also like to have them grouped, he should select “Group DNC/Callable Contacts.”
Finally, the user should click “Scrub” to process the list. This can take several minutes, depending on the size of the file.
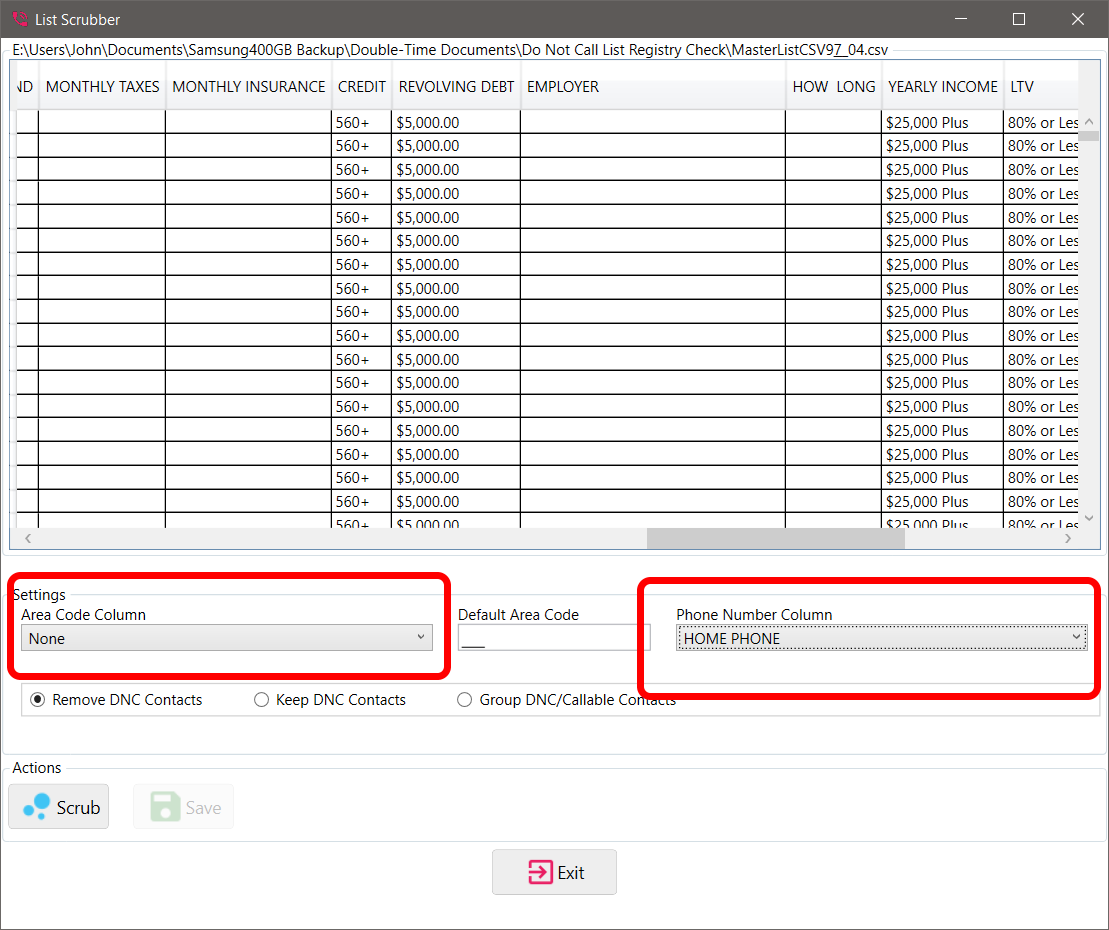
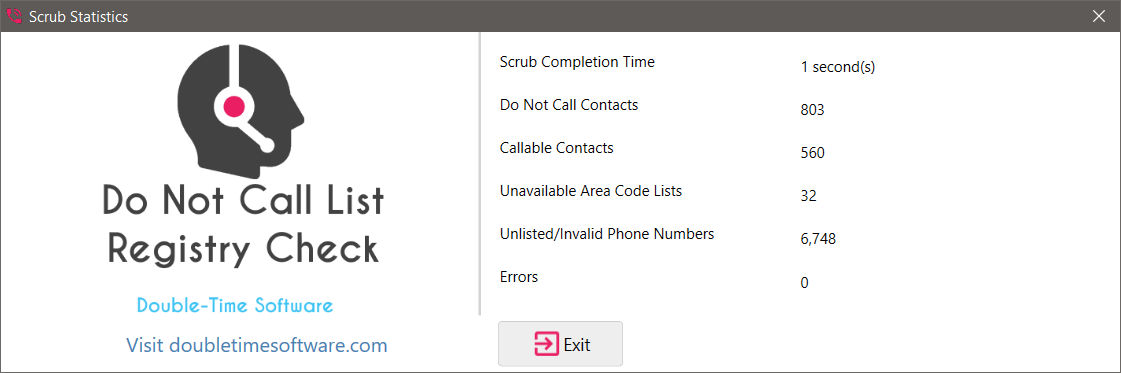
Once all options have been selected, click “Scrub.” A Statistics Screen will appear when scrubbing is complete.
To save changes, click “Save”.
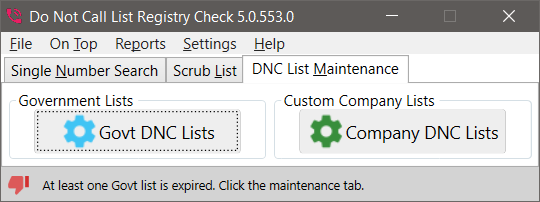
Warning System
The application periodically checks for expired government lists. If an expired list is found, the “Maintain Lists” icon will turn into a red "thumvs down", and remain red until there are no expired lists in the system.
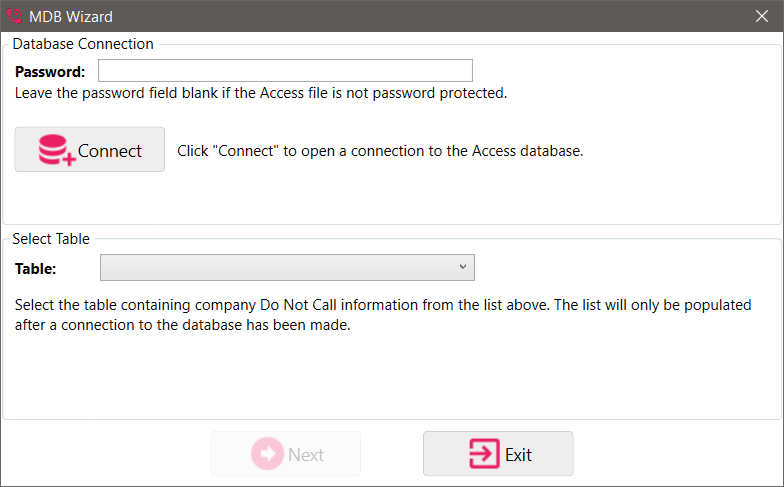
MDB Wizard
When working with MDB or ACCDB (Access Database) files, you will be presented with the MDB Wizard. Working with the wizard is a two step approach. First, you must connect to the database. If your database is password protected, enter your password in the password field, otherwise leave it blank. Click “Connect” to open a connection to the database. Once a connection is made, select the appropriate table from the drop down list. Finally, click “Next” to exit the Wizard.
Reports
To view a history of phone number imports (both Government and Custom) or a history of contact list “Scrubs”, select “Reports” from the main menu and then select the appropriate option. The report that is generated can be saved as a comma delimited file (CSV) so that it can be viewed in spreadsheet programs such as Microsoft Excel.
Depending on usage, over time Log Reports may grow large. A log report can be cleared by clicking the “Clear Log” button. It is highly recommended that the log is exported before clearing the log because data lost after clearing the log is not recoverable.
Updates
To check for a new version of Do Not Call List Registry Check click “Help” in the main menu and then click “Check for Updates.”